PAGE TWO
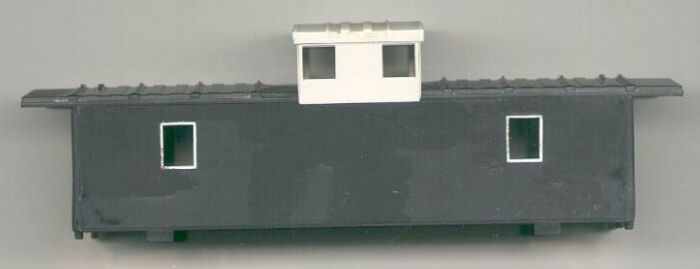
Make new side window openings. The easiest way to setup the lines for correct window placement is to use the equipment drawing provided on Page One, and on your copier, scale the drawing to the correct HO scale (use a 1:87 rule to verify some known dimension I used the 30 interior length dimension).
I placed the body on top of the drawing, making sure to locate the A and B ends correctly (A is slightly longer than B). I used a small machinist square to transfer the windows from the drawing to the body.
 I
measured how tall each window was, and its location from the underside
of the window to the bottom of the body, and marked this on each end. I
then used a straight edge to layout the upper/lower window lines.
I
measured how tall each window was, and its location from the underside
of the window to the bottom of the body, and marked this on each end. I
then used a straight edge to layout the upper/lower window lines.
Using a small drill bit, make holes along the inner perimeter of each window, and then use a Xacto knife to cut them out, and a file to finish opening the windows out to the scribed marks.
Once the side windows are cut in, do the same thing for the end windows, as the existing window on each end is not large enough.
The door windows arent quite right either, but I choose to leave them as-is.
Window frames are made using 2 x 3 styrene, cut and cement them in place after the window holes are filed square/to size. I used an old flat freight car weight that I held behind the window to keep the pieces from falling thru as I placed and cemented them into the openings. Remove the weight after all the window trim is cemented, as the cement does stick but not bond to the steel.
Fill all holes in the body and roof with putty,
and sand smooth.
<Go to Page One Go to Page Three >
![]()
Send EMail to the DT&I Modeler's
Page!
Go Back to Model Building Articles