This kit includes:
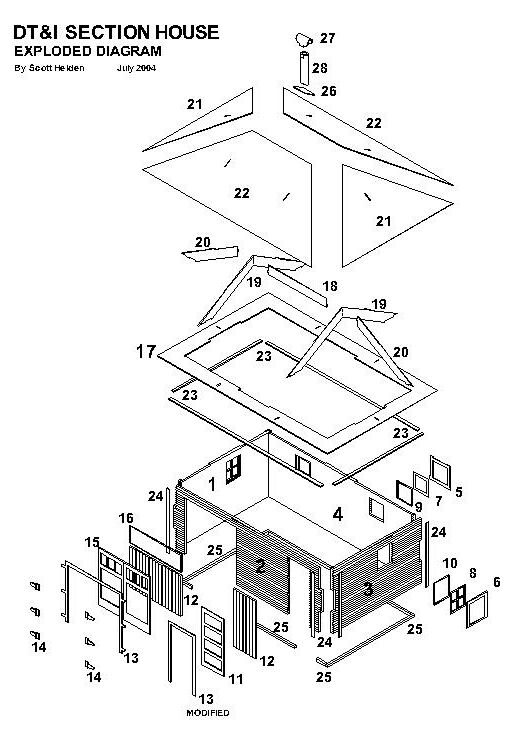
2. Cut the window frames (5,6) you will be using from the sheet and glue them to the outside of the corresponding wall around the window opening.
3. Cut out the window frames (7,8) you need from the sheet and test fit them in their openings along with the corresponding piece of 0.015 glazing (9,10). Set the frames and glazing aside.
4. If you are installing a personnel door, make the trim for the personnel door by cutting off the hinge tabs on the handcar door trim (13) and cutting off one vertical door trim leg at the underside of the top horizontal bar. Glue this piece to the corresponding side of the door opening. Place the rest of the door trim around the opening and mark how much material needs to be cut off the top horizontal bar. Remove the excess material and glue the trim in place.
Cut the personnel door frame (11) from the sheet. Cut down a piece of the 6 vertical grooved siding to the same width as the door frame (12) and glue the frame to the front face of the siding. When dry, glue the door into the wall flush with the face of the door trim.
5. If you are installing a handcar door, cut the door trim (13) out of the sheet. Cut the hinges (14) out of the sheet and glue them onto the trim with the hinge joint centered on the inside edge of the door trim and aligned vertically with the door trim. When dry, glue the handcar door trim around the opening.
Cut two handcar door frames (15) from the sheet. Take a piece of the 6 vertical grooved siding (12) and remove 24 from the top (this will be replaced with a piece of 0.015 glazing). Glue the two handcar door frames to the front face of the siding aligned flush with the bottom of the siding. Test fit the 0.015 glazing (16) behind the top of the doors, and trim the glazing down flush with the top of the door frames if necessary. Dont glue it in install the glazing after the structure is painted. When dry, glue the handcar doors in the wall opening to the back of the hinges.
6. Cut out the roof soffit (17) from the sheet. Glue the four walls together and make sure they are square using the roof soffit as a guide. When the walls are dry, glue the roof soffit to the top of the walls.
7. Cut the roof framing pieces (parts 18 to 20) out of the sheets. Clean out the slots in the roof framing pieces, and lightly file down the top and bottom edges of each tab to make sure they are square and will fit easily into their slots.
Glue the ridge support piece (18) between the A-frame support pieces (19) with the ridge support tabs in the BOTTOM slots on the A-frames. Glue the tabs in the bottoms of the A-frames into the corresponding slots in the roof soffit (17). Glue the side supports (20) into the TOP slots in the A-frames and the slots in the roof soffit.
8. Cut out the roof sheets (21 to 22) and clean out their slots. Test fit the side roof pieces (21) on the side supports (20) and when youre sure they fit glue ONLY the tab into the slots in the side roof pieces. Test fit the front roof piece (22) by turning the structure upside down on top of the front roof piece and fitting the tabs into the slots in the roof. When they fit glue ONLY the tabs into the slots.
Turn the structure over and glue the front edge of the roof piece (22) to the roof soffit (17), making sure the outside points on the bottom of the front roof piece line up with the edge of the roof soffit. Glue bottom of the side roof pieces to the soffit, making sure their edges line up with the edge of the front roof piece. Glue the back roof piece (22) in place the same way as the front one and glue it to the roof soffit. When dry, turn the structure over and glue the roof supports to the roof pieces and glue the joints between the roof pieces together.
9. Glue pieces of 1 x 4 trim (23) to the underside of the roof soffit (17) against the walls, starting with the sides. Glue the short pieces of 1 x 4 trim (24) to the outside corners of the walls they should extend about 0.020 below the bottoms of the walls.
10. Glue pieces of 0.030 x 0.030 styrene (25) to the bottoms of all the walls, aligning them with the INSIDE edges of the walls. Dont glue any material underneath the doors.
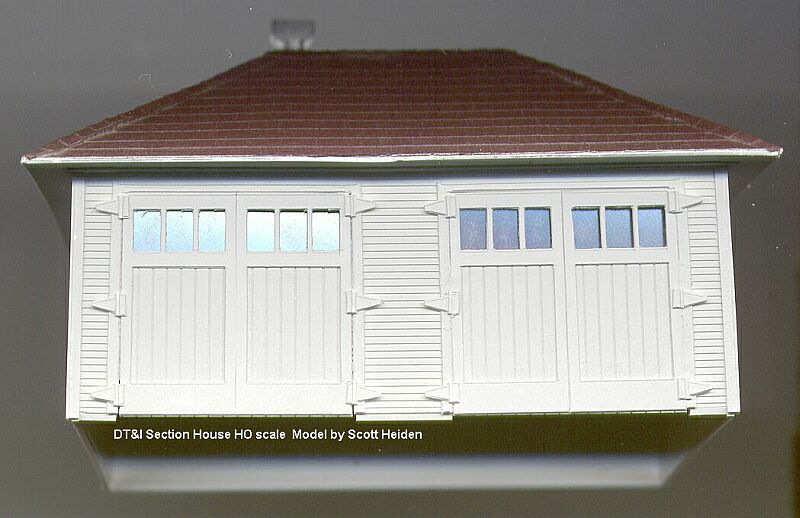
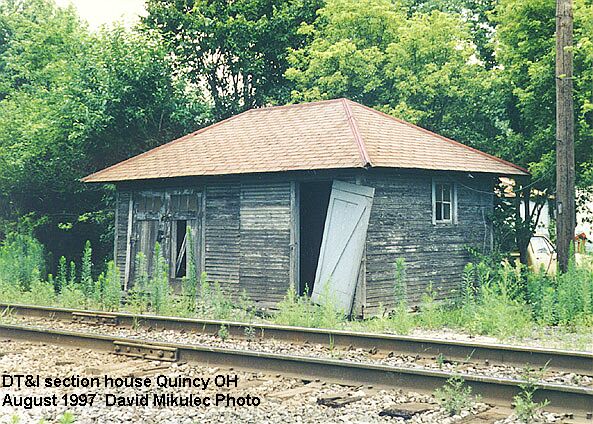
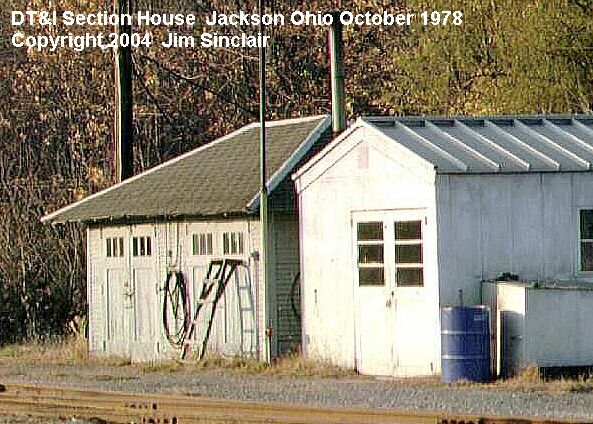
11. Paint the structure and the window frames light grey. The original paint scheme was light grey with white trim, later simplified to all light grey.
12. Glue the 0.015 glazing to the window frames and the handcar doors with white glue or Woodland Scenics Accent Glue. Glue the windows into the openings with a couple dabs of white glue in the inside corners.
13. I recommend using masking tape to simulate asphalt shingles. Cut strips of tape 5mm wide and long enough to cover one long face of the roof. Cut halfway through the strips every 12 scale inches to simulate the tabs on a real shingle. Draw enough rows of tick marks every 2.5mm up from the bottom edge of each roof panel to make it easy to align the shingle strips parallel on the roof.
Starting from the bottom edge, lay a strip of shingles on one roof panel and cut off the excess material with scissors. Lay another row 2.5mm up, making sure the cuts in the shingle strip are offset 6 scale inches from the one below it. Keep going until the roof panel is covered, then do the same to the next one until the entire roof is covered.
14. Cut pieces of shingle strip 12 scale inches wide to cover the ridges on the roof (some roofs had aluminum flashing use 0.060 styrene angles to model them). Start at the bottom of one corner and lay down one piece, followed by another piece 2.5mm above it until you reach the top of the roof. When all four corners are done up to the top of the roof, lay the 12 pieces over the ridge of the roof, starting from one side and laying the next piece 2.5mm over from it until you reach the other side.
Mask off the building and paint the shingles a reddish-brown or dark red is a good color. Originally the structures had red shingles and flashing.
15. Cut the stove pipe base (26) and stove pipe cap (27) from the sheet. Bend the stove pipe cap around a 1/8 drill bit to form it, and glue it to the top of the stove pipe (28). When dry, glue the stove pipe to the center of the base make sure the stovepipe cap is parallel with the top edge of the base so the pipe will be vertical when it is glued to the roof.
Paint the stack and base aluminum. Glue the base with ACC to the back face of the roof. Its upper right corner should be three shingle rows down from the ridge (about 30 scale inches) and 2 scale feet from the right edge of the back face of the roof.
16. Place the structure on the layout youre done!