From Con-Cor's HO 60' Box Car
Background

Equipment Diagram: Greenville 25000's
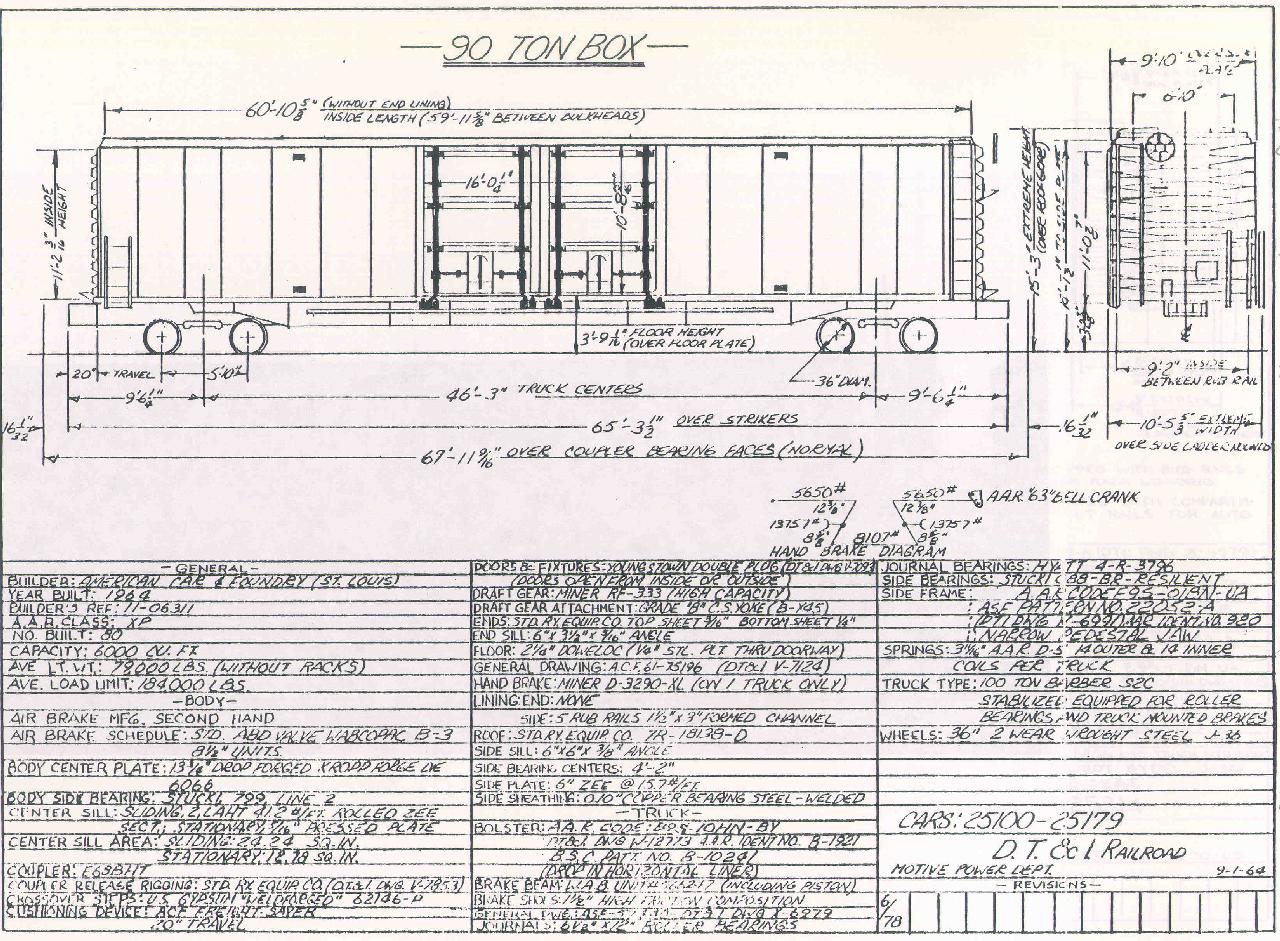
Equipment Diagram: ACF 25100's
Equipment Diagrams courtesy of Brian Everett
The DT&I rostered two number series of 60 auto parts cars manufactured by Greenville Steel, 25000-25049 and 25200-25314. The cars built by ACF were numbered 25100-25179. The main difference between the two manufacturer's cars was in their construction. The Greenville cars featured riveted panels like the Con-Cor kit while the ACF-built cars featured welded side panel construction. Both cars can be modeled from the same kit; modeling the welded ACF cars would involve removal of the rivets and scribing weld lines in their place, as well as deepening the side sill under the doors.
Information courtesy of John Alaniva.
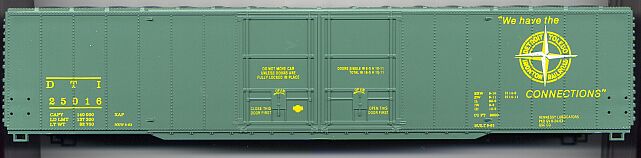
Con-Cor #9608 DT&I 60' Greenville Boxcar Kit (the DT&I kit
is out of production, of course)
![]()
Major Modeling/Detailing Notes:
1. WHEEL BASE: To model the 25100-25179 ACF cars and the 25200-25314 Greenville cars, the kit needs the wheel base lengthened to 463( the kit is fine as-is for the 25000-25049 series cars) . Cut the underframe next to the first rib after the bolster on each end. Measure a scale 7 4 from the center of the king pin hole toward the coupler pocket and make another cut.
2. UNDER FRAME: Glue the center sill in place. Test fit the resized bolsters (turned 180° from original position), filing the ribs on the floor for a flush fit. Place a wheel set/truck with 36 wheels (use ATLAS #195000) and note areas of interference. You may have to cut into the floor to allow trucks to pivot freely.

Stock underframe above, modified underframe and coupler pockets below
3. COUPLER POCKETS/DRAFT GEAR: The kits need extended draft gear (Walther # 1030). Remove coupler cover from each end of floor. Notch the floor back about 1/16 so that molded part line on coupler pocket lines up with ribs on car end. Glue original coupler cover (or a similar sized piece of .020 styrene) onto the floor and glue top portion of new coupler pocket on this. Drill and tap a 1-72 hole through the bottom of the draft gear cover to fasten it. Thread the screw through the cover and coupler box and cut flush with top of box. Cut a small piece of .010 x .250 styrene on the top of the coupler box to hide the hole.
4. CAR BODY: For best appearance replace all ladders with DW parts. Use DW#1005 for the 8 rung ladder and DW#169 for the 4 rung. Use A-line type A stirrups (#29000). Drill a #77 hole to mount stirrups and secure with ACC.
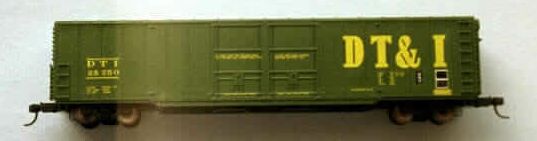
Finished model using John Alaniva's custom decal set
5. PAINT: Color is a dark green. I find that Floquil Reading Green (#110183) gives the best appearance for a recently shopped car. Under frame and trucks are a weathered black.
6. DECALS: Decal sets were once made by John Alaniva (they may be available again soon). Youll need the lubrication plates from either Herald King or Microscale as well.
7. WEATHERING: Since my intention was to model a recently shopped
car, weathering was minimal. Some grime on the roof and dust on the trucks
took the stark new appearance away.
Additional footnote: Starting in 1977 fleet was being repainted using yellow block letters to replace the original compass logo. Stencil drawings I have show that series was to receive star herald o/a 1979 as they were shopped, but I have not seen any photos to document this.
Modeling information, photos provided by John Alaniva.
![]()